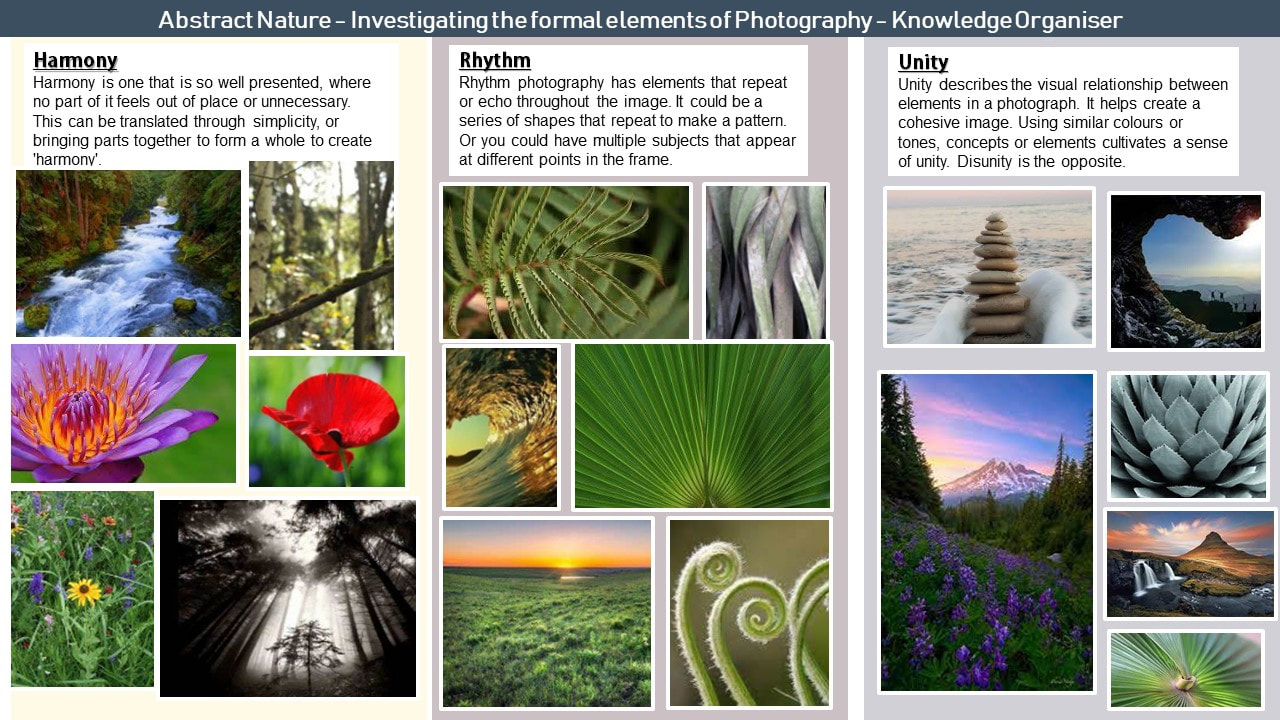
Abstract Nature / Personal Project 1

Abstract Nature / What is Abstraction
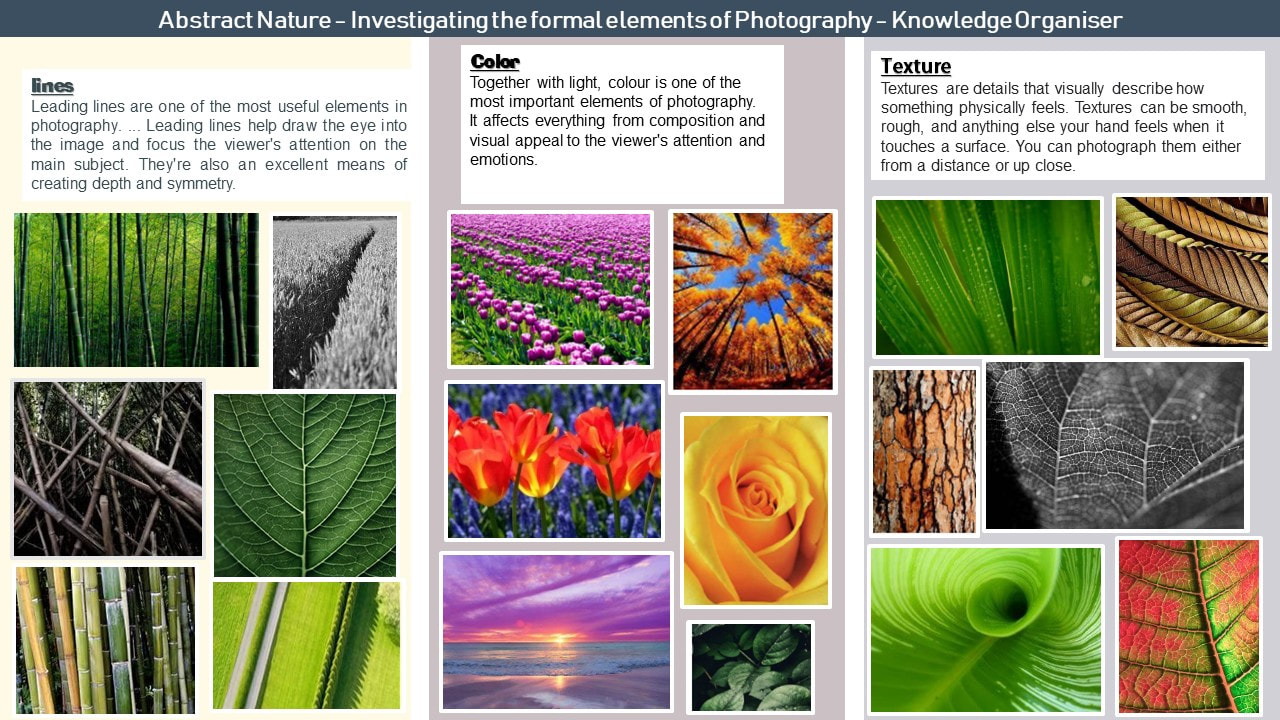
Abstract photography, sometimes called non-objective, experimental or conceptual photography, is a means of depicting a visual image that does not have an immediate association with the object world and that has been created through the use of photographic equipment, processes or materials. Primarily, abstract photography focuses on the elements of art and the principles of design. These are know as the formal elements of photography.


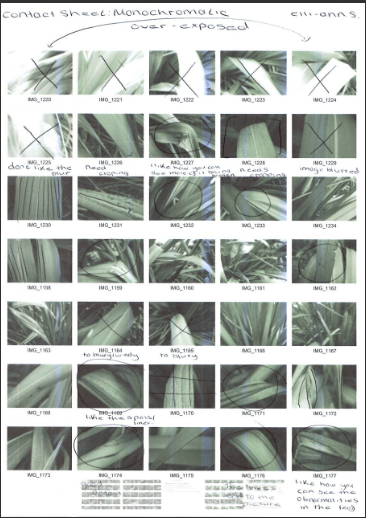
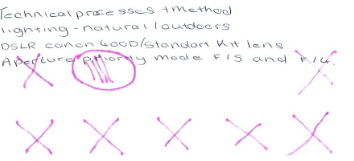
Abstract nature / INVESTIGATION OF ABSTRCT PHOTOGRAPHY TECHNIQUES/ Monochromatic Photography
|

|


Shooting in black and white has many advantages: one of the main ones being you can see more detail to the picture in black and white. You can see things that you wont normally see in colours ones. For examples; textures, spots and abnormalities.
At the start of our shoot, we set the aperture priority mode / AV mode on our cameras, we changed the picture style to black and white (monochrome) and we set our aperture to the smaller numbers which will give us the widest aperture. I used f5.
Then we went outside and started out shoot. Firstly I started shooting at eye level then moved on to above eye level and below eye level.
The weather conditions where good as it wasn't raining and it wasn't sunny meaning there wasn't too much light. The slight windiness helped a lot as I got to take a few shot of the leaves moving in the wind. I think shooting in black and white means you can see more detail in the pictures more than ones in colour.


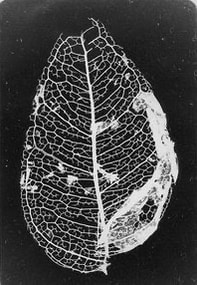
Abstract Nature / Best 4 Images

I feel like this is one of my best pictures as it has some well developed detail. You can clearly see the line and pattern detail throughout this image. In the post-shoot editing I attempted to use the tonal histograms to darken the picture down. I also experimented with the curve tool to make different parts of the image lighter and darker, I put the shadow up to 16 to make the front leaf blurry. Overall, I believe I made my image better by making it darker, blurring certain parts and bringing out some of the imperfections of the leaf.

I believe this images was one of my best images. This image follows the rules of thirds as it has the most important part in the middle square, you can see the details and the lighter part of the leaf but then you also have a different plant, which adds to the pictures in the top left and middle left column. (I isolated two pictures to show this). During the editing stage, i adjusted the exposure to -12, moved some of the curves to brighten the middle of it and moved the shadows up a bit.


I believe this was one of my most successful edits. While editing this image, I adjusted the levels to make the right side of the leaf brighter/sharper than the left side. I also added some blur to the background and made some improvements using the curves tool. This helps draw focus to all the details in the image, I believe I made this image better as you can now clearly see the top of the leaf and see all of the little details with in it.

I feel like this is my favourite/ best image I have edited. I feel like all the different sizes of the lines and the darkness of them really adds to the image. I adjusted the curves and shadows a lot to really darken out the background. I like how this draw attention to it as it's so dark and then the brightness/ sharpness of the leaf brightens up the image.
Abstract Nature / INVESTIGATION OF ABSTRACT PHOTOGRAPHY TECHNIQUES/ ICM

|

|


ICM (Intention camera movement) involves a camera moving throughout the expose to create a blurred effect. For this to occur, you need to get a camera and while you are taking your pictures, you need to rotate you camera left to right, up and down or even in a circular motion.
During this shoot I used my DSLR camera (canon 400d with the standard kit lens). For this shoot I used shutter speed priority mode 0"4. This and the rotation of the camera left the final outcomes with a blurred effect and sometimes even a spiral effect.
For this shoot, I was indoors using artificial lights. At the beginning of my shoot, I did struggle to get the lighting correct as the final outcomes where coming out too bright (meaning they where over exposed). So that did mean I had to restart the shoot on a different shutter speed,


Abstract Nature / INVESTIGATION OF ABSTRACT PHOTOGRAPHY TECNIQUES/ Shallow Depth Of Field

|
|


Shallow depth of field is when you blur the background to emphasis the object in front of you (fore ground). This means the photographer has the ability to withhold the context that the background could provide.
For this shoot, I used my DSLR canon 400d with the standard kit lens, using AV priority settings. I put the aperture to f/4 and occasionally f/5.
I did once again face some challenges through out this shoot, the main one being where a handful of my photos didn't blur in the background meaning I had to look at a different approach to take them. During this shoot, I shot at eye level and out side with natural light giving me a clearer image. The weather conditions during this shoot were good as it wasn't winding meaning the plants stayed still and I could get up close to get the best results.


Artist Investigation / Edward Weston
“My own eyes are no more than scouts on a preliminary search, for the camera’s eye may entirely change my idea.” – Edward Weston

Why this artist?
To begin my Artist Nature Investigations, I will initially study the work of Edward Weston because he is an inspiring photographer and I like the final outcomes of his images.
Who is he?
Edward was born in on the 24th March 1886. He is known for his monochromatic shoots using a view camera to create a photographic film. He turns normal objects into things that loom quite unusual and different.
Why the quote?
I chose this inspirational quote because it sum up/ typifies the work of Weston because it shows that you may see something differently before and after taking a photograph and it can change your idea of it completely.
Why this video?
This video is inspirational to me because you can see variety of different work done by Weston and see all the different things he photographs. I believe these images are some of his best work meaning it will be the best for me to experiment and emulate with.
Below are a section of 10 Weston images that are inspirational to me because its amazing to see all the different work he has created:


SEMI Analysis / Edward Weston
|
Subject
The Photographer of this image is called Edward Weston. The title of this Photograph is Pepper NO. 30 dating back to 1930. The genre of this photograph is still life (a genre of photography used for the depiction of inanimate subject matter, typically a small group of objects. Similar to still life painting, it is the application of photography to the still life artistic style) and it is also abstract. The props I can see in this picture are that this is a green pepper which is deformed that Weston has photographed. 
Element
The composition of the photo shows that the pepper is placed in the centre of the image (the middle ground). I would say the rule of thirds has been used as in each of the squares, you can see something different going on. The viewer’s eye is lead around the photo because of the composition & perspective Edward Weston has used. The perspective that Weston has taken the photo is from eye level as you can see directly in the middle of the image. This perspective is effective because you can clearly see all the detail in the image and can interpret it in your own way. Weston employs a range of visual elements in his work. The most striking elements are form, tone, colour, movement, line and space. He uses tone really well as you can see the different colours/tones of the greys, black and whites. At the top it is darker and as you move further down the image, its gets lighter. I also think he uses line as you can see the intricate line on the pepper. Some may even say it looks like a human figure because of how the lines sit in this image. Media
This photo has been taken from a short distance so you can see the pepper up close. The back ground is plain and simple and then the pepper is right in the centre the image. This is so the pepper is the main focal point and the viewers eyes lead straight to the middle ground of the image. I think this photo has been taken in a studio using lamp to create some different tones on the pepper. The light source is placed below the object (the pepper to create this effect. To emulate this photo, I would get a pepper and place it into a dark place while a light source (a lamp) is pointing underneath it. This would create the lightness at the bottom and the darkness at this top. Then I would take numerous photos and chose my best one which emulates this best. |

Intent
I feel this photo conveys a message of sadness as the pepper could be represented as a human figure sat in darkness and the lightness gradually going towards them. I does this buy getting lighter the further you look up at this image and by the pepper having such intricate line throughout it. |


Technical processes / Low Key Photography

Low-key photography is a genre of photography consisting of shooting dark-coloured scenes by lowering or dimming the "key" or front light illuminating the scene, and emphasizing natural or artificial light only on specific areas in the frame.
Low key photography has the ability to ad drama/ hard-hitting emotion within a shot.
To shoot Low key images you will need:
• Camera
• Tripod (or steady surface) – optional
• One light source (natural or artificial)
• Black background or dark setting
Low key photography has the ability to ad drama/ hard-hitting emotion within a shot.
To shoot Low key images you will need:
• Camera
• Tripod (or steady surface) – optional
• One light source (natural or artificial)
• Black background or dark setting
Shoot Plan / Edward Weston

This shoot was inspired by Edward Weston because I like his work and wanted to try it. I also like how imaginative he is with his work and how he looks at normal objects and turns them into abstract photography. This shoot will take place by a window preferably on a sunny day so you can get the light and dark tones on the object. The props used will be a plant pot, back paper and on object to put inside (vegetable). The black paper will allow me to be able to put the object in the pot and not have to see the floor/windowsill I took the picture on. During my shoot, I tried to use different colours of vegetables to create different tones within my pictures. The lighting I will require is natural lighting by the window. Because of this, the vegetable with have some lighter effects on it and also some darker effects, especially round the back where no light is getting to it. This type of photography is low key which will give it a darker background. I intend to shoot with a 400D DSLR canon camera and use a tripod to stabilise my camera. By stabilizing it, it will give it a more cleaner look as there wont be any movement from anything. I intend to use a fast shutter speed of 1/160 and 1/140 so that the images wont blur with any movement that may occur.

This shoot is also inspired by Edward Weston. For this shoot, it will take place in the class room with a black out bod set up. I got some black card and set it up behind and at the side of the shooting area. The lighting will require is an artificial light source that is set at different angles to create different light effects on the vegetable. I intend to shoot with a 400D DSLR canon camera and once again use a tripod to stabilize my camera. This will stop any movement to occur during shooting. I intend to shoot I a fast shutter speed of 1/140 and 1/160.
Contact Sheet / Edward Weston

|

|
Digital Editing Process / Edward Weston


Best images / Edward Weston

I chose this image due to its texture and contrast. I feel these elements really stand out as you can see the texture in front of the object (the onion) within the image. In my opinion, I really like how the background is really dark but the vegetables are brighter meaning they complement each other. To best emulate Weston's work, during the editing process I used PIXLR. Firstly, I used the brightness tool and turned it down to -56. Doing that caused the vegetable to darken. Then I put the contrast up to 5 to darken the background. To then darken certain areas out of the image, I used the Lassos tool and selected the parts of the image I wanted to change. This image has been achieved on a Canon 400D using a 18mm-50mm lens which allows you to really zoom in on key parts of the image. Despite this, I feel like I could improve by image by placing the vegetable more in the centre to capture more of the textures within the centre of it.

I chose this image as I like how you have the main object in the centre of the image with the dark background. On the right hand side, there is also a bit of the vegetable which is blurred. I think this adds to image and emulates Weston's abstract work more. When editing my image, i darkened the background once again and when i used the curves tool, it added more highlights onto the middle of the vegetable. To achieve this image, I put my vegetable into a plant pot and put it as a 90 degree angle towards a window. This means that the natural light will hit off the the right hand side of it leaving the left hand side darker.

I chose this image as I like how the vegetable is off centred and how the shadow of it is in the background. Within this image, there are three vegetable with different amounts of highlights and shadows on each of them. This makes the image feel more full as then there isn't just one vegetable in the middle which people can focus on. While editing this image, I darkened down the background and gave the middle vegetable more highlights to it to contrast the darkness. To achieve this image I used a white artificial light at a 45 degree angle to light up one side of the vegetable and then to leave the other side in complete darkness. I was able to use low key photography during this as I used a slow shutter speed creating the image to be still and the light to illuminate certain parts of the image.

I chose this image as I like how there is only one area on the vegetable with is highlighted. and the rest is predominantly dark. When editing my final image I put the shadows to -95 and the highlights to 8. I also cropped this image to make the vegetable more centred. The use of the artificial light emulates Weston's work much better. I used my Canon 400D and zoomed in to capture a closer image to really focus on the lines of the vegetable. I do also like how you can fully see the outline of the vegetable. Despite this, I feel like if I had to edit this again, I would brighten up the background a bit to see the vegetable in more detail rather than just the outline and the small area where it it highlighted.
Abstraction through Cyanotypes / Anna Atkins

Who is Anna Atkins?
Anna Atkins (1799-1871) was an English botanist (from Kent, southeast England) and photographer. She is often considered the first person to publish a book illustrated with photographic images. Some sources say that she was the first woman to create a photograph. Her nineteen- century cyanotypes used light exposure and a simple chemical process to create impressively detailed blueprints of botanical specimens.
What are cyanotypes?
The cyanotype is a photographic printing process that produces blue prints using coated paper and light. The cyanotype is a slow-reacting, economical photographic printing formulation sensitive to a limited near ultraviolet and blue light spectrum, the range 300 nm to 400 nm known as UVA radiation.Creating cyanotypes does not involve the use of a camera. The process is carried out by coating a sheet of paper in iron salts and placing it in the sun with an object laid on it. It is then washed in water, creating a rich blue image and leaving a pale imprint where the object lay.
What are the advantages/disadvantages of cyanotypes?
The use of cyanotypes is really good as they are cheap and easy to use. They are also relatively easier to create as a dark room is not required, and it utilises the UV rays from the sun and iron salt solution rather than silver salt solutions of early photographic processes. On the other hand, there could be some issues as the sensitizer is often not well-absorbed by the paper and some tends to lie on the surface; being hygroscopic, it causes tackiness which can wreck your negative.

|

|

|
Carix Gleichenia immersa Spiraea aruncus Do modern artists still use this today?
Cyanotypes are still used today by many artists. However, during the 20th century the technique became more old fashioned and out of date. Below are some examples of modern artists using this process: 
Cyanotypes evaluation:
To create our cyanotypes, we began by preparing some water colour paper which was coated in a solution of iron salts. We used the water colour paper as it absorbed the solutions better which meant that the final image colour was bolder, creating greater contrast between the imprint and the background. Then we got a piece of fabric and did the same process onto that. Finally, we created a positive of our favourite image from our Edward Weston shoots. We then did a invert of it to create a negative on acetate. To achieve our negative, we went onto PixlrE and made it into an invert. This meant that the light will now be dark and the dark will become lighter. Personally, I believe that the fabric cyanotype was my most successful as you could really see the detail within the leaf and the fabric gave it more texture to the final outcome. If I could have another lesson on this topic, I would focus more on picking better leaf's to put onto my cyanotypes to create a better final outcome. I believe this would make it all come together more and make it look nicer. Abstractions through Photograms / Man Ray
Who is Man Ray?
Man Ray (1890-1976) was an American visual artist who spent most of his career in Paris. He was a significant contributor to the Dada and Surrealist movements, although his ties to each were informal. He produced major works in a variety of media but considered himself a painter above all. He was best known for is pioneering photography and was renowned fashion and portrait photographer. He is also noted for his work with photograms, which he called "rayographs" in reference to himself. What are photograms? A photogram is a photographic image made without a camera by placing objects directly onto the surface of a light-sensitive material such as photographic paper and then exposing it to light. When an object touches the surface of the paper it will shield it from any light and leave a white or pale grey impression. What are the advantages and disadvantages of photograms? When working with photograms, you have much more control over the layout and design of your image. You also don't need a dark room which will make it easier to achieve your final outcome. While using this process, you will be able to create abstract image and have the object fully stand out. However it is much harder to create more detail, your final outcome is much more unpredictable. This process also involves various chemicals- something many people don't have access too.
Horst P. Horst / The unfamiliar and abstracted |


Technical Processes / High Key

A high-key image consists primarily of light tones, without dark shadows. A photograph or painting so composed features a diminished tonal range of primarily whites and light greys. A high-key photo has a bright, positive feel compared to a dramatic and moody low-key image. Some high-key images, like the one above, can be quite high in contrast. In other cases, like the photo below, high-key photography is used to brighten the entire photo and give it a lo-contrast, etherial emotion to the photo. To create a high key image, you would need to use a bright remote flash at the power of 1/8 which is one the most important steps. Also, you would need to adjust your cameras shutter speed to 1/50 which would let in a lot of light to your image. Finally, adjust your IOS to 100.


Artist research/ Karl Blossfeldt
Nature educates us into beauty and inwardness and is a source of the most noble pleasure- Karl Blossfeldt 
Why this quote?
I have chosen this quote because I think it show Karl Blossfeldt passion toward his work capturing the many forms of nature. The quote shows his appreciation for nature and how wonderful it can be if you just take a step back and admire it. |
Why this artist?
The reason I have chose Karl Blossfeldt because of his work. I love how there are natural tones throughout then the background and there is normally a dark object in the centre which contrasts with the lighter background. Throughout his work, he uses the high key process which adds to his images. Who is he? Karl Blossfeldt was a German photographer and sculptor. He was born in 1865 and passed in 1932. He is best known for his close-up photographs of plants and living things, published in 1929 as Urformen der Kunst. He was inspired, as was his father, by nature and the ways in which plants grow. Why this video? I have chosen this video because it demonstrates the work of Karl Blossfeldt and showcases his best pieces. It also clearly explains his work and his journey of growing as an artist. the video shows examples of his work from his book that is made up of his most famous and inspiring images. |
Shoot Plan / Karl Blossfeldt


|
This shoot was inspired by Karl Blossfeldt as I have been studying the way he creates abstracted forms from nature and I was very keen to emulate his style.
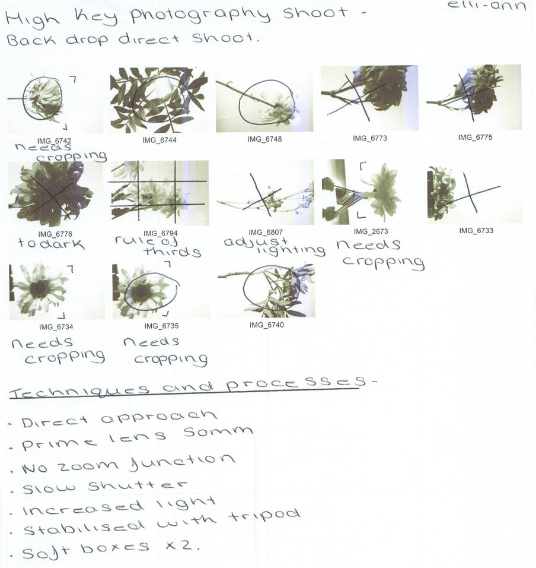
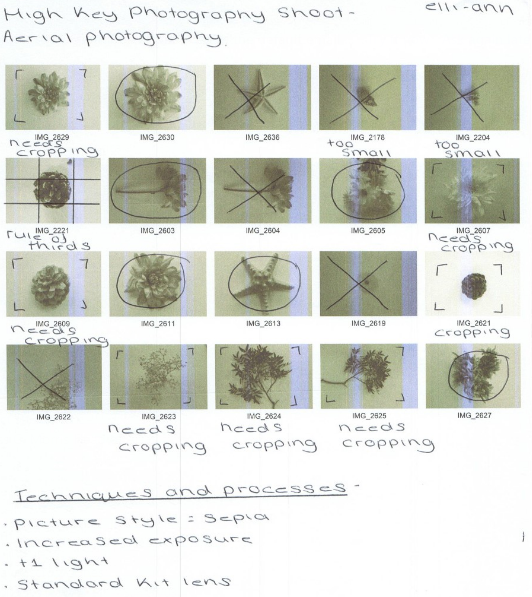
This shoot will be taken in the classroom so then I can control the lighting and get the best results. I will set u three shoots and will experiment with them all and try to emulate Blossfeldts work using the High-key photography technique. The props I will be using is natural forms. I'm using these as this will get my photos to fully emulate Blossfeldts work as this is what he commonly used. Using these, it will give me a good range of textures, lines and forms throughout my images. For all of my shoots, I will be using a white background. I will shoot I High-key for my images and use a combination of soft boxes, remote flashes, Perspex diffusers and natural ambient light. During all my shoots, I will need to control the lighting to avoid any shadows and distance my subject matter away from the back drop. I will use the school camera (DLSR 400D) with a prime lens 50mm, a macro lens and my own Canon 400D camera. I intend to shoot in sepia (picture style setting) to give an aged look on the photoshoot. In all of my three shoots, I will aim to use a slow shutter speed. This means it will let more light into the camera lens. I will also stabilise the camera using a tripod or books so the finer details can be captured. |


Equipment used- shoot plan / Karl Blossfeldt

Semi Analysis / Karl Blossfeldt


|
Subject
My chosen photographer is Karl Blossfeldt who is a German photographer and sculptor. He is best know for his close-up photographs of plants and living things, published in 1929 as Unformen der Kunst. Growing up, his biggest inspiration was his father- August Blossfeldt. He enjoyed nature and liked looking into the way plants grow. The title of the image i have selected is Saxifraga Wilkommiana. He enjoys getting his final product exactly how he images it. To achieve this, he enlarged the image 10 times. This particular image is still life which means it can capture fine details within the plant. Furthermore, this image was photographed in portrait which means that it will appear longer instead of wider. The props that Blossfeldt has uses is very minimal. He has used a pale back ground and a harsher colour of the plant to see the contrast between the two of them. It has been placed directly in the centre so that becomes the focal point of the image. Elements Blossfeldt uses the 7 visual elements of art in his work to create this photography. In my opinion, the two strongest elements within this image are tone and shape. Within this image, there is a contrast between the darkness of the plant and the pale back ground. The main element in this photograph is shape. I think this because different people could have different options of with the object is as it is very abstract and looks quite unusual. Blossfeldt mainly uses the monochromatic tonal range as they were the only options available at this time. Media The main focal pint of this image if the plant in the image. I know this because it is centred in the middle of the image. The plant has been placed in the foreground. This means the image is evenly proportional so there is an equal space around the object. I believe this photo has taken in natural light and he may of potentially angled an LED/UV light at it to brighten it up. I think the light has mostly come from above as the image is lightened up all evenly, there are no parts of the image that are brightened up/ darkened down which means the light must have not come from any certain side. To emulate Blossfeldts work I would use my DSLR 400D Canon camera and put it into monochromatic mode. I would then stand up a Perspex sheet with my subject placed in front of it. Intent I feel this image gives the mood of sadness as the image is quite cool toned and no outstanding points so the image comes across as lifeless and has nothing to it. When I emulate this image, I will use a dimmer light to create the darker image. This will capture the feeling of sadness within the image. The image is showing the dark leaves and roots to contrast between the beige background. This may be to contrast between happiness and sadness. |


Contact sheets / Karl Blossfeldt
|
|

Editing process/ Karl Blossfeldt


|
1: To begin editing my image, I crop the image down the make sure that the object is directly in the middle so it follows the rule of thirds throughout the whole image. I achieved this by selecting the crop tool over on the left, chancing it to rotate mode then positioning git in the middle.
|
2: Secondly, I use the wand select and outline the object to create a lighter background than i already have. I chose to do this as it then emulates Blossfeldts work much more.
|


|
3: Then I adjust the level in the picture to lighten up the lest side of the image but darken the right side. As a result of this, they contrast between each other and emulates Karl Blossfeldts work.
|
4: Finally, I adjust the image one last time using the curves tool. This makes the image a bit lighter on the lest side.
|

|
Final Image: After all of the editing processes, this is the final image I have got. I think this emulates Blossfeldts work and shows how light an image can get using the High key photography style.
|
9 Best Images / Karl Blossfeldt


Final Outcome / Explosion Sketchbook


|

|
Artist Research/ Dennis Wojtkiewicz


|
I use a Canon EOS 90D camera with a Canon EF 100mm f/2.8 Macro USM fixed lens. The only reason I even know about the technology is because my colleague told me that's what I needed and would be the biggest bang for the buck. The rest of it is all by feel. I have absolutely no photo training. For me that suffices because I'm not hung up on technical stuff. Just looking for ways to capture information for my paintings Why this artist?
The reason I have chosen to explore the work of Dennis Wojtkiewicz is because I feel like i will be able to emulate his work and achieve some good end results of these image. Wojtkiewicz is modern photographer who pains his work after he photographs them. He uses macro and still- life photography to create his work. Who is he? Dennis Wojtkiewicz was born in Chicago, Illinois, United States, he is most famously known for his large-scale paintings of fruit and flowers, transfixed by his augmented angling on realism. Why this video? This video is inspirational to me because it showcases the artist's use of intensified chroma. This is something I would like to emulate in the editing of my own images inspired by Wojkievicz's work. Why this quote? The quote is from a direct email response from Dennis Wojtkiewicz. From the email, I was able to gain an incite into his photographic processes, when approaching making a reference image. I feel like I can emulate his work to my full potential. |


Photographic Techniques / Back Lighting Fruit

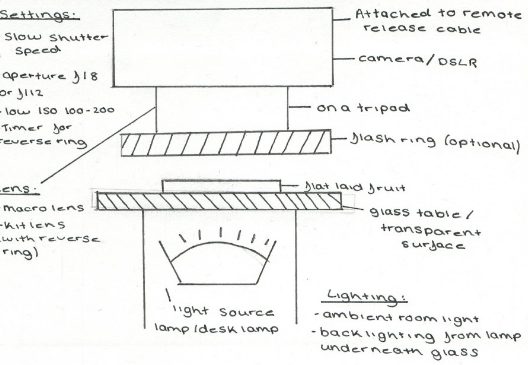
Backlighting is the process of illuminating the subject from the back. In other words, the lighting instrument and the viewer face each other, with the subject in between. This creates a glowing affect on the edges of the subject, while other areas are darker. Backlighting is beneficial as it emphasizes the depth behind the subject and gives images a greater sense of place. Backlighting can produce a dramatic contrast between the subject and the background. To capture the finer details, the photographer would have to use either a macro lens or a reverse ring. You also need to use a lightbox or a glass pane (with a light source underneath) to successfully backlight the object. Furthermore, a tripod should be used with a shutter release cable to ensure no camera shake.


|
Step 1: Slice the fruit (a kiwi or strawberry), ensuring the slices area even and thin, so the colours will be bright but not over-exposed.
|
Step 2: Lay the slice on the glass set-up, with the light source placed directly under the fruit.
|
Step 3: Adjust camera
|
Step 4: Take image
|
Shoot Plan / Dennis Wojtkiewicz
This shoot has been inspired by the paintings of Dennis Wojtkiewicz, he uses backlighting to create his image and his main feature of his photographs is colour. Using the back lighting techniques I will try and emulate his work. I will do this shoot indoors, this will give me better control over the lighting within my images. By using the natural lighting within the room, the ambient lighting will be a big part of y image however the may light source will come from an artificial light under a glass table/ glass sheet laid out across two chairs to keep it stable. The fruit slice I previously cut will be placed on the transparent surface, this will allow the light to pass through and illuminate the finer details of the subject. During my shoot, I will a range of fruits such as kiwis, strawberries, lemon, line and oranges. For the shoot to be done accurately, it is essential that all the fruit slices are cut extremely thin, this is to ensure that the light will pass through them to get the same effect as Wojtkiewicz images do. For this shoot, I will use my DSLR Canon 400D camera with a reverse ring to capture some photos in extreme macro detail. To eliminate camera I will use a tripod with a release cable. The camera setting i will use is f/8-f/12; low ISO for better image quality; slow shutter speed to ensure a lot of light is passed through ; a two second timer to stop all camera movement and finally in the extreme macro/reverse ring element of the shoot, will have a longer 4-5 second timer as avoiding camera shake is essential to capture any clear details.
Contact Sheet/ Dennis Wojtkiewicz

|

|

Post Editing/ Dennis Wojtkiewicz

Editing step 1: In this clip, I used the adjustment tool to enhance the colour, saturation and contrast within my image. This help me as I was able to amend my exposure and bring the finer details out of my image.
|

Editing step 2: Within this screenshot, I used the lasso select tool to draw around my image. This made sure I was able to cut of any of my image I didn't want in my final result like the background. I then filled it in with the solid white colour leaving me with just my image in the centre.
|

Editing step 3: Using Pixlr E, I duplicated my image and began to position my image all over the image to create this look. Throughout this, I decided to rotate some of my images so they all looked slightly different throughout and some of the stood out more than others.
|

Editing step 4: Finally, I adjusted some of the fruits colour by using the auto pop, auto B&W tool, darkened a few of then and then left the rest. This made the fruit all look different.
|
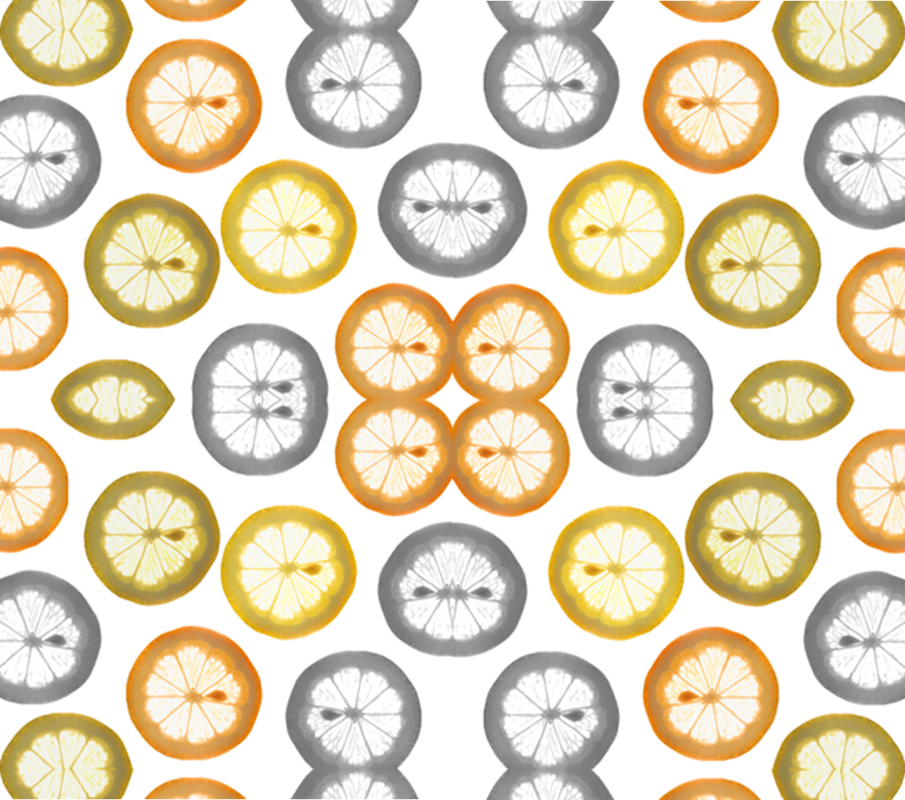
Rotational designs/ Dennis Wojtkiewicz
Using rotation symmetry and using the work of Horst P. Horst, I have created a series of rotational designs using the abstract elements of shape, colour, form, tone, repetition and harmony. I will develop these further using PIXLR.


Abstract Nature / Hand Manipulation Sample Boards


Abstarct nature/ final evaluation
During this project, I have developed my ability and understand to use photography to create this project. Prior to exploring the work of many different photographers during my GCSE course, I had no understanding or ability to achieve many skills like digital editing, taking photos and emulating the work of many artists. However, I am now confident about the work I am producing and the way I am editing my final images. Some skills I have learnt during this time are: the use of my Canon 400d camera, the use of ICM (intentional camera movement), analysing and applying my knowledge of composition, cyanotypes/photograms, emulating artists and the way I use my camera to great the best outcomes.
Throughout the course of this project, I furthered my understanding of photography and how different images can be from one another. This includes a variety of different natural form ranging from flat-laid fruit to plants/flowers. This has thoroughly allowed me to understand photograph from many different points of views/perspectives. I believe this has helped me during this project as I have looked at worked using all of the 7 element of art (line, shape, form, space, form, colour and texture) and seeing how these can vary in one image.
Initially, I researched the work of Edward Weston. Weston was a German photographer born in 1886. He was famous for his skill of turning everyday objects into something so unique where many see something different to somebody else. His most famous piece of work was his photo of ‘Pepper NO.30’. I was curious about the way Weston photographed his images and wanted to emulate them for myself. So, I begin by collecting various fruits and vegetables and placed them inside of a plant pot onto of a black piece of A3 paper. I did this to create the curved affect like Weston and I photographed by letting a lot of natural light come through onto one side of my image and kept the other side darker. This meant they contrasted together gaining a nice affect on my final outcomes. His work helped me understand the theme of abstract nature by knowing that it doesn’t need to be filled with bright colours and various thing going on within the picture more that it can be as simple as a vegetable photographed in black and white while also capturing the finer details.
After studying Edward Weston, I investigated the work of Anna Atkins. The English photographer and botanist- born in 1799 - was most famous for her work with cyanotypes. When beginning to study Atkins, I was invested in trying to emulate her work as it fascinated me by how she mixed photography and art into one to create these cyanotypes. I was intrigued by the cyanotype process; the technical employment of light and deliberate selection of specimens based on transparency or opaqueness, something I took into consideration in my emulative work. Within her work, the main elements she used was colour, shape and line. The blue colour on the images evolved overtime due to the exposure it had to light when producing these. To emulate her work I placed a thin layer of iron salts across a piece of water colour paper. I used this as it absorbed the solution easier meaning the final image was bolder, creating a greater contrast between the imprint and the background. I then placed my leaves/plants onto and put them under a LED light and let them sit for 10 minutes or so. Her work with cyanotypes help me understand the theme of abstract nature as she used normal leaves and plant and created these abstract looking cyanotypes.
Similarly to my research of Anna Atkins, I briefly looking into the American artist Man ray - born in 1890 -. During my research of Man Ray he also was able to further my perception of what photography is. He uses photograms which are where a photographic image is produced without using a camera but by placing object directly onto the surface of a light-sensitive material such as photographic paper and then exposing it to light. When the object touches the surface of the paper, it will shield it from any light and leave a white or grey imprint on the paper. During this research I began to fully see how art overlaps with photography and how much they both work well together. Throughout studying Man ray, I was able to explore the concepts of tone and line in much more detail. Within all of his work you can clearly see all the tones throughout and I believe these all contrast with one another. His work made me understand the theme of abstract nature as I was made aware of different ways to create art/photography and not just through a camera like most artist use now a days.
To further my knowledge on abstraction and how to present these in later final images, I took inspiration of Horst P. Horst. Horst p. Horst was a German fashion designer who used rotation symmetry to create new patterns from nature. To create my emulations of his work I used my final 9 and best 4 images from my first shoot of working with monochromatic. I used these as I believe these made my final outcome look the best and these were some of my most successful final outcomes as the composition felt immediately convincing and compelling. His work helped me further my understand on the theme of abstract nature by teaching me how to edit my emulations of his work and how I should find.
Additionally, I research the work of Karl Blossfeldt. This still life, German photographer allowed me to explore new lighting styles in contrast to my previous work emulating Edward Weston. I was inspired by his work by the cooler tones throughout his work and how he made them contrast well with the objects (plants) within his images. When exploring his work, I began to notice that in his images, he used a large amount of lighting and brightness to highlight the entire subject and its textures rather than a specific focal point. Additionally, he uses the sepia tone, greys and whites to create a warm and happy feeling whilst still being able to see the smaller elements and details in his work. Through studding Blossfeldt, I was able to explore the concepts of shape, colour, form and unity. To emulate his work I used three different set up to photograph my piece. The first set up was a white background with light directed from the left and the right, a tripod set up in front where my camera stood with a release shutter cable. By using this, it allowed my camera to stand still meaning my images weren't blurred and stayed in focus. The subjects I was using were held up by a piece of blue tack which was attached to another tripod in front of the camera set up. This meant that during the editing stage, we had to remove the blue tack from the images. In my opinion I believe the second setup allowed me to capture my best work. This set up contained a white piece of Perspex diffuser with a remote light behind and a light angled from the left to brighten up the front. This shoot allowed the most light to enter my shots meaning it emulated the work of Blossfeldt well. Finally, we did our last shoot which was an produced at an aerial angle. I believe these were the least successful because the paper used wasn't fully white meaning when photographing them the background was more yellow which made the editing process harder. When taking this photos we were on the floor with the natural light shining on them, this meant that some images allowed a shadow in. During the editing process, I felt it was hard to remove the shadows and the blue tack from my images so spent a lot of time trying to get my best ones which emulated his work best.
The final artist I researched was Dennis Wojtkiewicz who an American photographer and painter. I was thoroughly inspired by his work as I enjoyed researching his work and the amount of detail that he was able to capture in his photos. Dennis was one the more unusual artists I studied as he photographs his work and then he painted it to get his final image. Through studying Dennis, I was able to explore the elements of shape, colour and form. Dennis expressed the work of shape through the different angles at which he takes his photos. Colour is a very noticeable part that features with in Wojkiewiczs work as he uses certain colours which complement each other well. This can also help the texture become more noticeable by highlighting and hiding features. Dennis's work inspired me greatly so to emulate his work, I selected a variety of fruits and vegetables such as kiwis, cucumbers, grapefruits and lemons. I sliced them very think so when I placed an LED light underneath them, it highlighted all the textures within it. I backlit them by placing a piece of glass between two chairs with a light source beneath them. I did two of these shoots; one of these shoots at school and the other at home both with the same setup. I believe my first shoot- at school -was the most successful as I was able to capture all of the details much better than my second attempt at home. The images I took were used for my mock exam and to prepare for this I edited my favourite subjects out and made them into patterns onto a white background. with my finishing result, I overlaid them with my Edward Weston rotational images. I then collaged these together with a black and white version and a coloured one. Wojkiewicz's work inspired me as I was able to understand and explore the use of backlit photography and how I can use this in something else such as my collage.
To summarise, I believe my most successful shoot was my Dennis Wojikiewicz work. I also found this shoot the easiest shoot to complete and to edit in the end. I feel my final board with my collages and dye sublimation were very successful. In these outcomes, I used a combination of some of my best work so far; monochrome final edits, Horst P. Horst rotational work and my Dennis Wojikiewicz rotations. I used all of my knowledge from all of my previous projects and transferred them into my final outcome to create a brilliant outcome. I also feel like my editing skills have improved over the course of this project and it becomes more clear in my final outcomes.
However, going forward I still have many areas that I need to improve on. I need to work on camera skills and understand my camera settings much more such as ISO, aperture and shutter speed. Throughout some of work it becomes clear that it doesn't always go to plan as my setting aren't right. Furthermore, I feel like I also need to understand the artist I am trying to emulate and understand why they use that sort of photography and how they use it within their work. Finally, I believe that I could annotate my final images and my contact sheets in more depth. I believe I could look at how my images may be portrayed in different ways and how another person may see a different a different story within my images
